Progress bars are an excellent tool to show visual data and statistics. It shows your numbers like sales, statistics, data, etc in an animated fashion. It is one of the best design elements to showcase data in #Wix_Studio and #Wix_Editor websites.
In this article, I will share the entire process on how to add, design, and animate a progress bar using the Wix Velo code. I will also share the necessary code required and teach you how to modify the code yourself and create a beautiful animation.
If you find this article helpful, make sure to comment and give a rating to the article. It encourages me and helps me improve my content. Feel free to ask questions as well.
What is a Progress Bar? How to Add It In Wix Studio?
The progress bar is an input element in the Wix website that shows the progress of any process, such as form fills, loading, showing target and accomplished values, etc. It can be used with the #CMS or with the Velo to dynamically show the content.

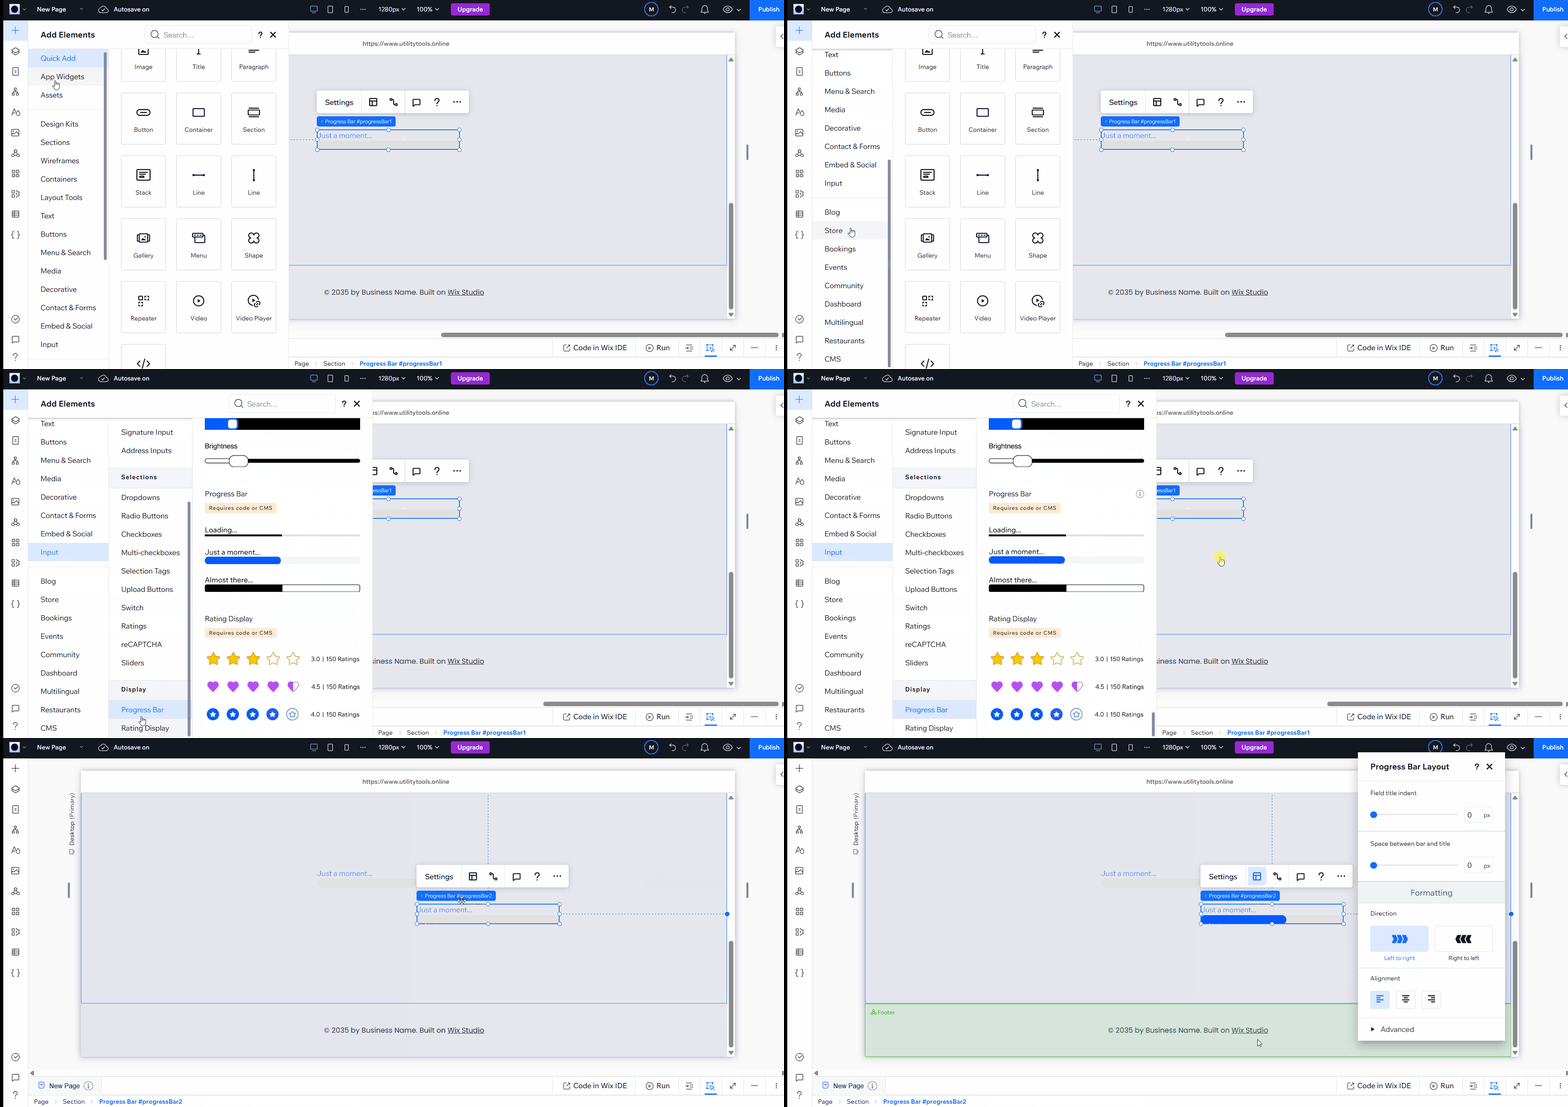
You can find the Progress Bar in the Wix Website Editor>Input Elements>Design>Progress Bar.

Once you locate the progress bar, simply drag and drop it into the editor.
Animating Progress Bar Using Velo
To animate the progress bar, we are going to use the following Velo code. While it may look intimidating to people without coding experience, please do not worry. Using the code is straightforward.
First off, copy the entire code given below and paste it in your Wix Editor. Make sure the Dev Mode is on. Here is a quick guide on how to enable the developer mode in Wix – https://dev.wix.com/docs/develop-websites/articles/get-started/quick-start
This code animates 3 Progress Bars together. However, you can modify it for any number of progress bars. The codes related to each progress bar are color-coded to help you understand better.
$w.onReady(() => {
    $w("#progressBar1").targetValue = 100;
    $w("#progressBar1").value = 94;
    $w("#progressBar2").targetValue = 100;
    $w("#progressBar2").value = 98;
    $w("#progressBar3").targetValue = 100;
    $w("#progressBar3").value = 96;
});

$w.onReady(function () {
    const progressBar = $w("#progressBar3");
    const targetValue = 96;
    const duration = 3000;
    const interval = 50;
    const step = (targetValue / duration) * interval;

    let currentValue = 0;
    progressBar.value = currentValue;

    const intervalId = setInterval(() => {
        currentValue += step;
        if (currentValue >= targetValue) {
            currentValue = targetValue;
            clearInterval(intervalId);
        }
        progressBar.value = currentValue;
    }, interval);
});


$w.onReady(function () {
    const progressBar = $w("#progressBar2");
    const targetValue = 98;
    const duration = 3000;
    const interval = 50;
    const step = (targetValue / duration) * interval;

    let currentValue = 0;
    progressBar.value = currentValue;

    const intervalId = setInterval(() => {
        currentValue += step;
        if (currentValue >= targetValue) {
            currentValue = targetValue;
            clearInterval(intervalId);
        }
        progressBar.value = currentValue;
    }, interval);
});


$w.onReady(function () {
    const progressBar = $w("#progressBar1");
    const targetValue = 94;
    const duration = 3000;
    const interval = 50;
    const step = (targetValue / duration) * interval;

    let currentValue = 0;
    progressBar.value = currentValue;

    const intervalId = setInterval(() => {
        currentValue += step;
        if (currentValue >= targetValue) {
            currentValue = targetValue;
            clearInterval(intervalId);
        }
        progressBar.value = currentValue;
    }, interval);
});
How to Implement the Code?
Now, let me show you the process of implementing the velo code to get the desired animation.
Step 1 – Assign Element ID
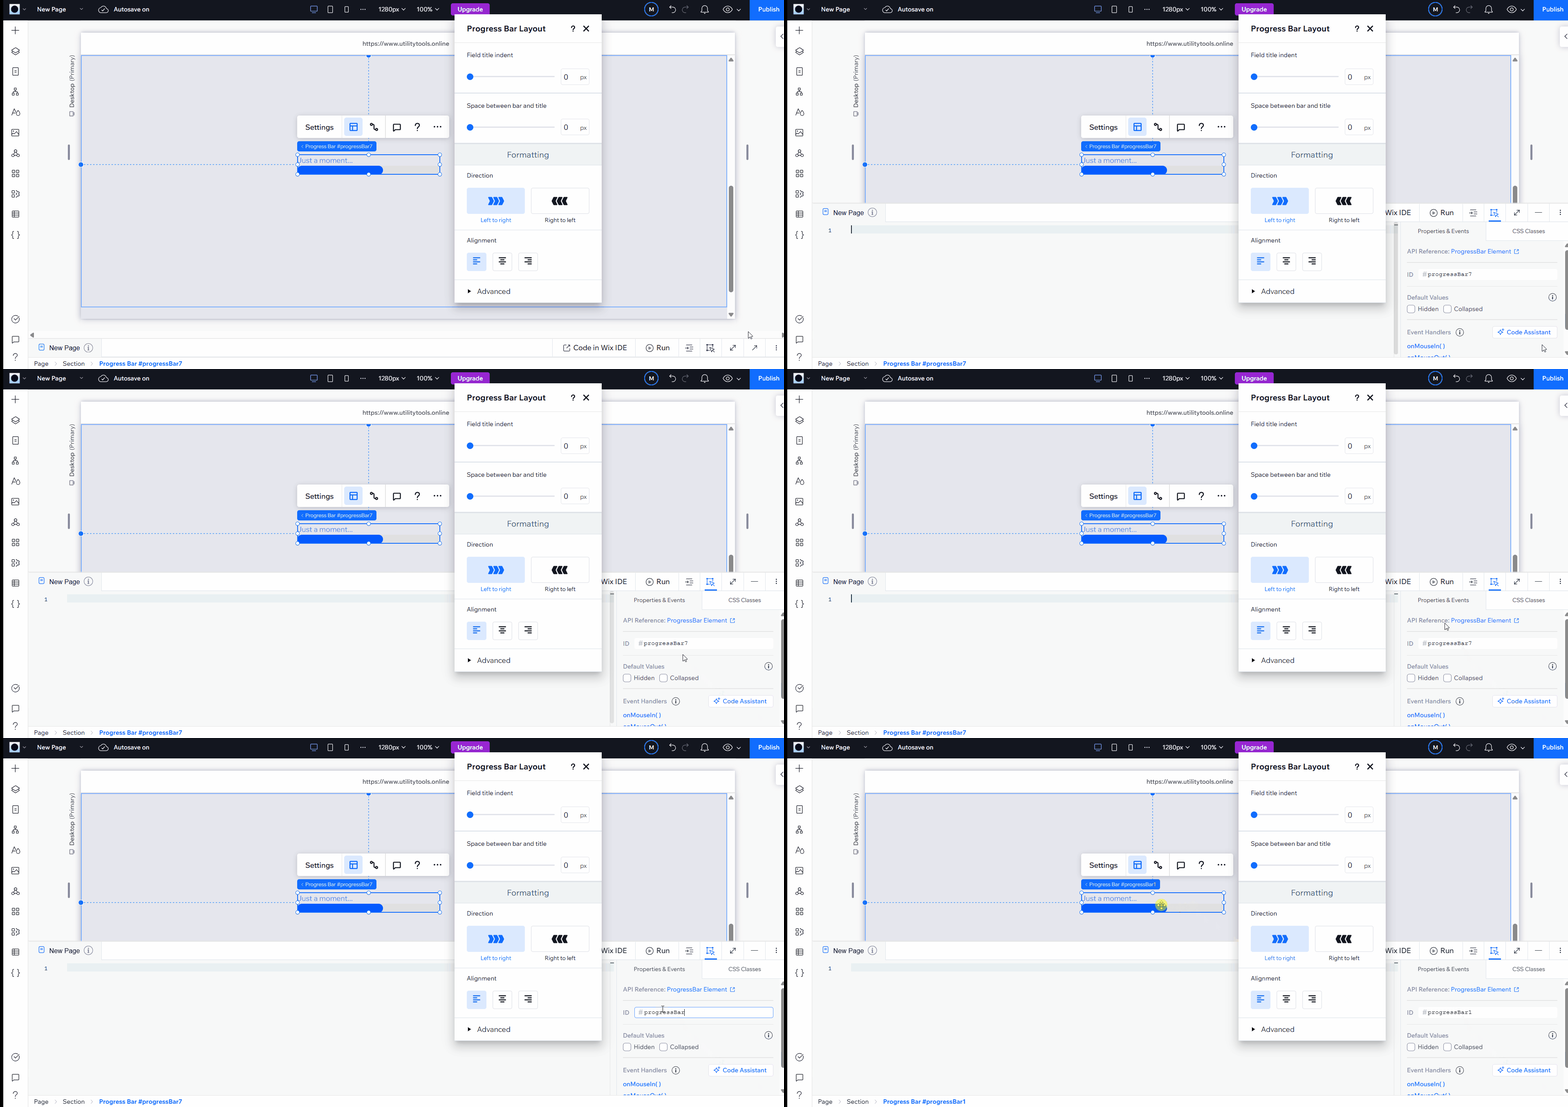
First, you need to assign the element IDs to the progress bars. Select the progress bar, go to “Properties and Events”
The following code part has the element IDs
$w("#progressBar1").targetValue = 100; // progressBar1 is the ID
    $w("#progressBar1").value = 94;
    $w("#progressBar2").targetValue = 100; // progressBar2 is the ID
    $w("#progressBar2").value = 98;
    $w("#progressBar3").targetValue = 100; // progressBar3 is the ID
    $w("#progressBar3").value = 96;
The following GIF shows how to assign an element ID to an element. Follow it to add the ID to all your progress bars.

Add as many progress bars as needed, and add another line of code. For example, if you want to show four animated progress bars, write the code –
$w.onReady(() => {
    $w("#progressBar1").targetValue = 100;
    $w("#progressBar1").value = 94;
    $w("#progressBar2").targetValue = 100;
    $w("#progressBar2").value = 98;
    $w("#progressBar3").targetValue = 100;
    $w("#progressBar3").value = 96;
    $w("#progressBar4").targetValue = 100;
    $w("#progressBar4").value = 96;
});
Similarly, add another code section duplicating the following, replacing the element ID. –
$w.onReady(function () {
    const progressBar = $w("#progressBar4");
    const targetValue = 96;
    const duration = 3000;
    const interval = 50;
    const step = (targetValue / duration) * interval;

    let currentValue = 0;
    progressBar.value = currentValue;

    const intervalId = setInterval(() => {
        currentValue += step;
        if (currentValue >= targetValue) {
            currentValue = targetValue;
            clearInterval(intervalId);
        }
        progressBar.value = currentValue;
    }, interval);
});
Step 2 – Set The Target Values
In this step, change the target values as per your needs. This value is changed in the following code line –
$w.onReady(() => {
    $w("#progressBar1").targetValue = 100; // Highest Value
    $w("#progressBar1").value = 94;  // Value Achieved
    $w("#progressBar2").targetValue = 100; // Highest Value
    $w("#progressBar2").value = 98; // Value Achieved
    $w("#progressBar3").targetValue = 100; // Highest Value
    $w("#progressBar3").value = 96; // Value Achieved
});
In the code line
$w("#progressBar1").targetValue = 100;
The value 100 is the upper limit/highest value of the progress bar. For instance, let’s say your company has 10000 products to sell, then that value will go at the place of 100.
In the code line
$w("#progressBar1").value = 94;
The number “94” shows the target achieved out of 100. In the same example, let’s say you have sold 5678 products out of 10000; in that case, the “5678” will replace “94”.
Finally, change the target value in the progress bar code as well to make sure it animates to the correct length.
$w.onReady(function () {
    const progressBar = $w("#progressBar1");
    const targetValue = 94; // Place 5678 in place of 94 here as well.
Now your progress bar will show the animation in such a way that it will fill up the progress bar up to the achieved value out of the target value.
NOTE: – The target value set in the code overrides the value set in the element’s settings.
Step 3 – Change the animation settings
The final step is to change the animation settings of the progress bar. It can be done using two simple parameters.
const duration = 3000;
    const interval = 50;
The const duration controls the time taken to complete the animation. 1000 equals 1 second, which means in our case, the animation completes within three seconds. For the const interval, 50-100 is a sweet spot for a smoother animation.
Another important additional feature is in the code line
let currentValue = 0;
This value let us set the starting point for the animation. Suppose you want to start the animation from 2000 instead of 0, then just replace the “0” with ‘2000″ in the code.
Conclusion
The final code for our progress bar animation looks something like this –
$w.onReady(() => {
    $w("#progressBar1").targetValue = 10000;
    $w("#progressBar1").value = 5678;
});


$w.onReady(function () {
    const progressBar = $w("#progressBar1");
    const targetValue = 5678;
    const duration = 10000;
    const interval = 100;
    const step = (targetValue / duration) * interval;

    let currentValue = 0;
    progressBar.value = currentValue;

    const intervalId = setInterval(() => {
        currentValue += step;
        if (currentValue >= targetValue) {
            currentValue = targetValue;
            clearInterval(intervalId);
        }
        progressBar.value = currentValue;
    }, interval);
});
This code animates a single progress bar with ID “progressBar1”. Now you can add as many progress bars as you want and animate them as you like. You can design the colors, fonts, and texts from the element’s layout and value setting panels.
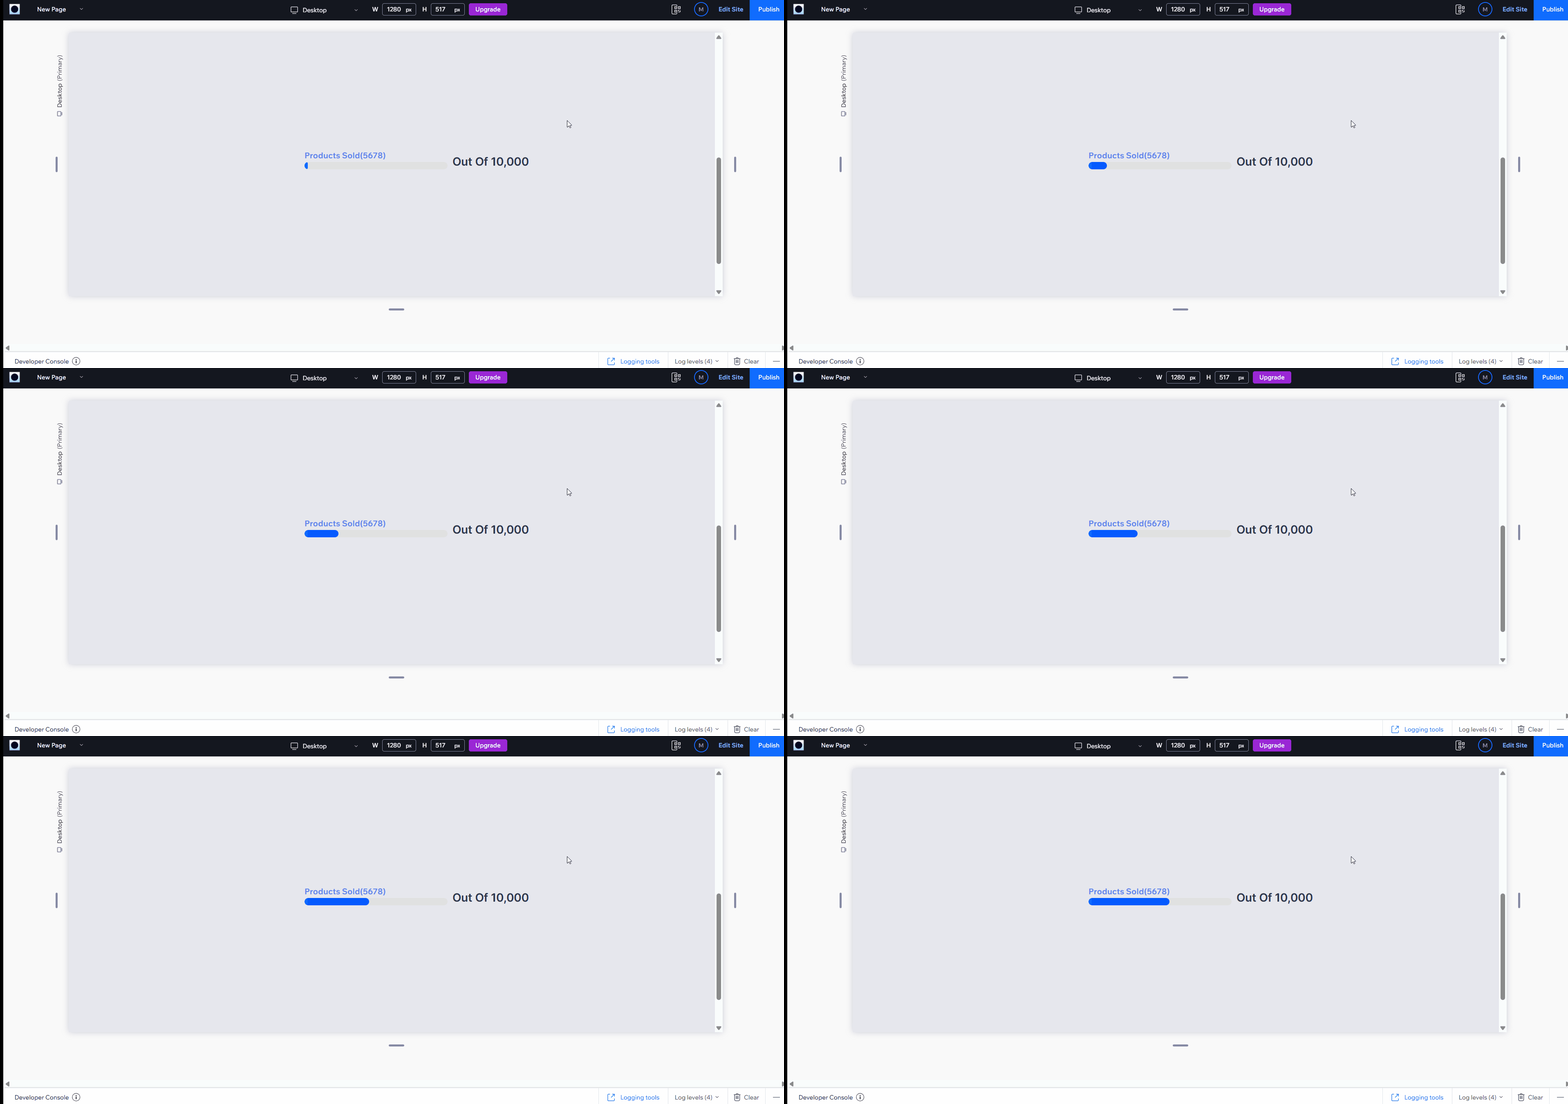
The final Output for the code looks like this –

